Provide the tokens for the CoW AMM to your Safe wallet before creating the CoW AMM. Beware any imbalance between tokens will automatically be traded.
Prerequisites
Before using the CoW AMM Deployer, ensure that you have the following:-
A Safe wallet: If you don’t have one, follow these steps to create a new Safe wallet:
- Go to the Safe website and click on “Create new Safe”.
- Choose the network (e.g., Ethereum) and the number of required confirmations.
- Add the owners of the Safe wallet and set the threshold for confirmations.
- Review and create the Safe wallet.
- Necessary tokens: Transfer both tokens that you want to provide liquidity for to your Safe wallet. Make sure you have sufficient amounts of each token.
Creating an AMM
To create a new CoW AMM using the deployer, follow these steps:- Access the CoW AMM Deployer app from your Safe wallet.
- On the homepage, click on the “Create AMM” button.
-
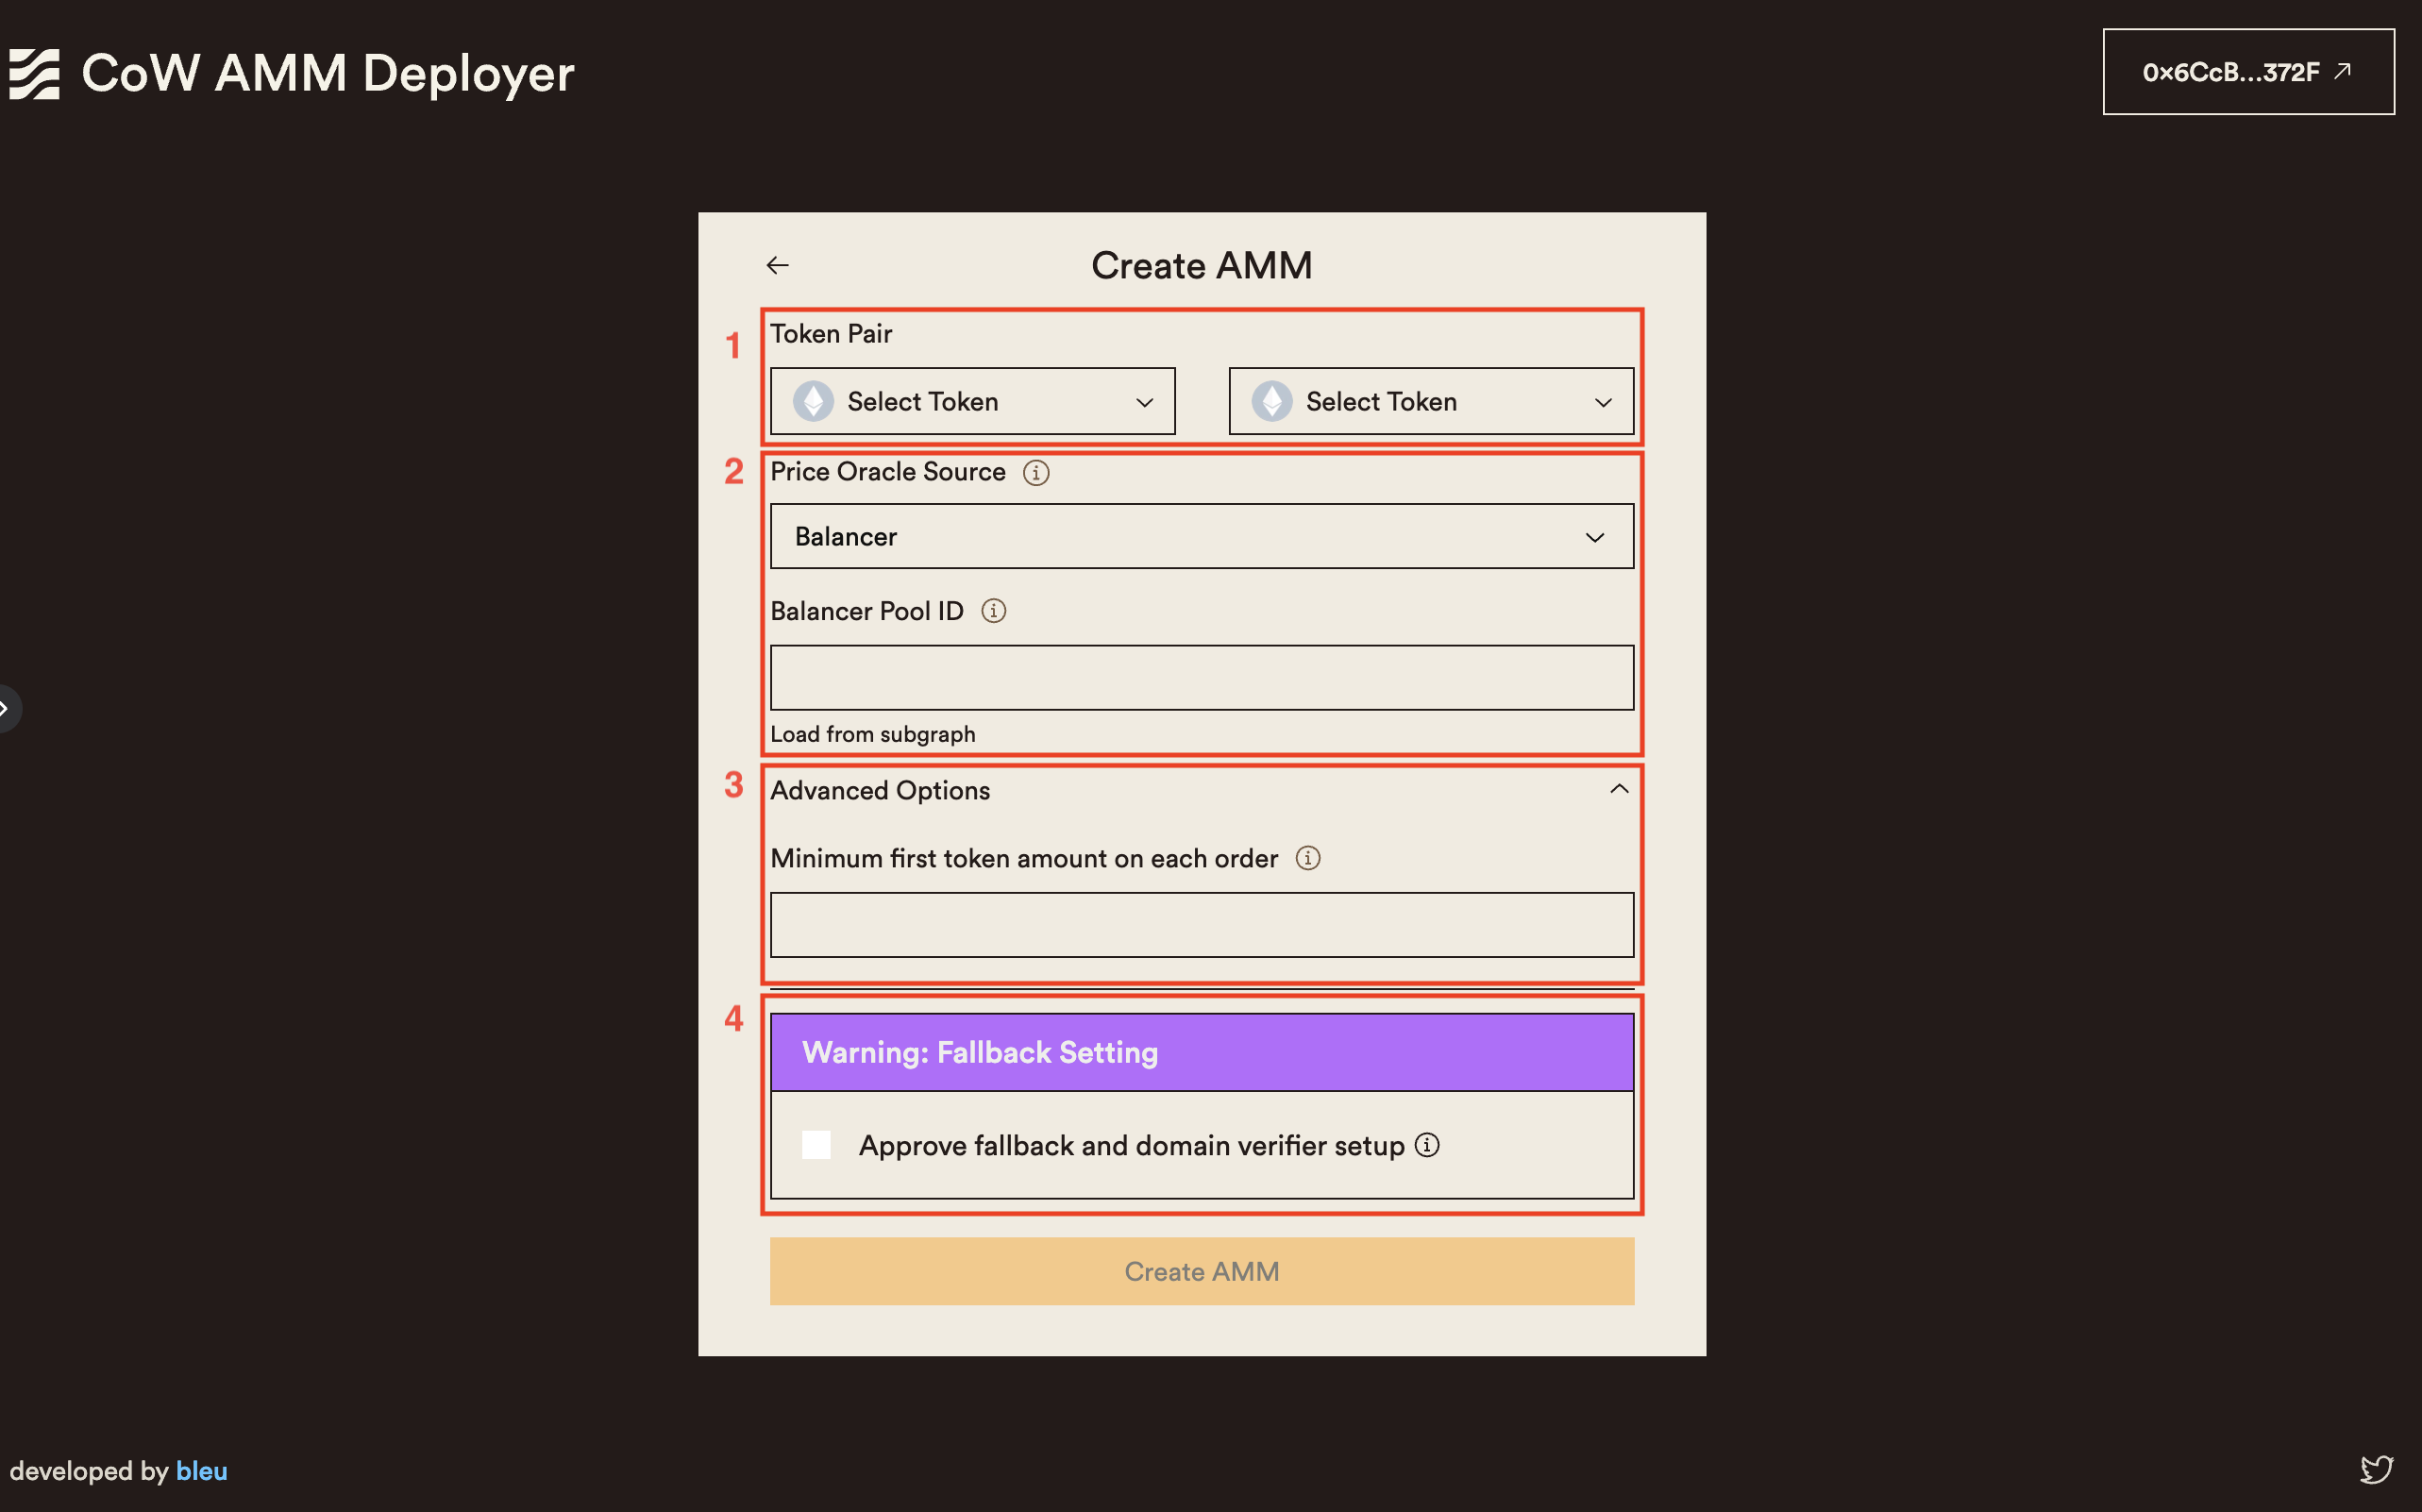
Fill in the required information in the AMM creation form:
- Token Pair: Select the token pair you want to provide liquidity for. Both tokens should already be in your Safe wallet.
- Price Oracle: Choose the price oracle (e.g., Balancer, Uniswap V2) to provide price hints to the watch-tower about your CoW AMM. Enter the pool identifier used by the selected protocol. You can also load this information from the protocol subgraph using the provided button. If the button fails, it means there isn’t a pool with at least $1000 USD of TVL for that token pair.
- Minimum Trade Amount: Specify the minimum amount of the first token required for each trade. For most tokens, this value is automatically filled. If not, a strategy may be to calculate the equivalent of $10 USD in the first token.
- Fallback Handler: If your wallet is unsupported, upgrade to a Safe with the special fallback handler. Learn all about the new Safe Extensible Fallback Handler and its relevance to Safe in this overview. Naturally, the upgrade process has undergone extensive auditing for increased peace of mind.
- Review the entered information and click on the “Create AMM” button.
- Sign the transaction on your Safe wallet to confirm the AMM creation.
- Wait for the transaction to be confirmed. You will be redirected to the “Manager” page once the AMM is successfully created.
Managing and Editing an AMM
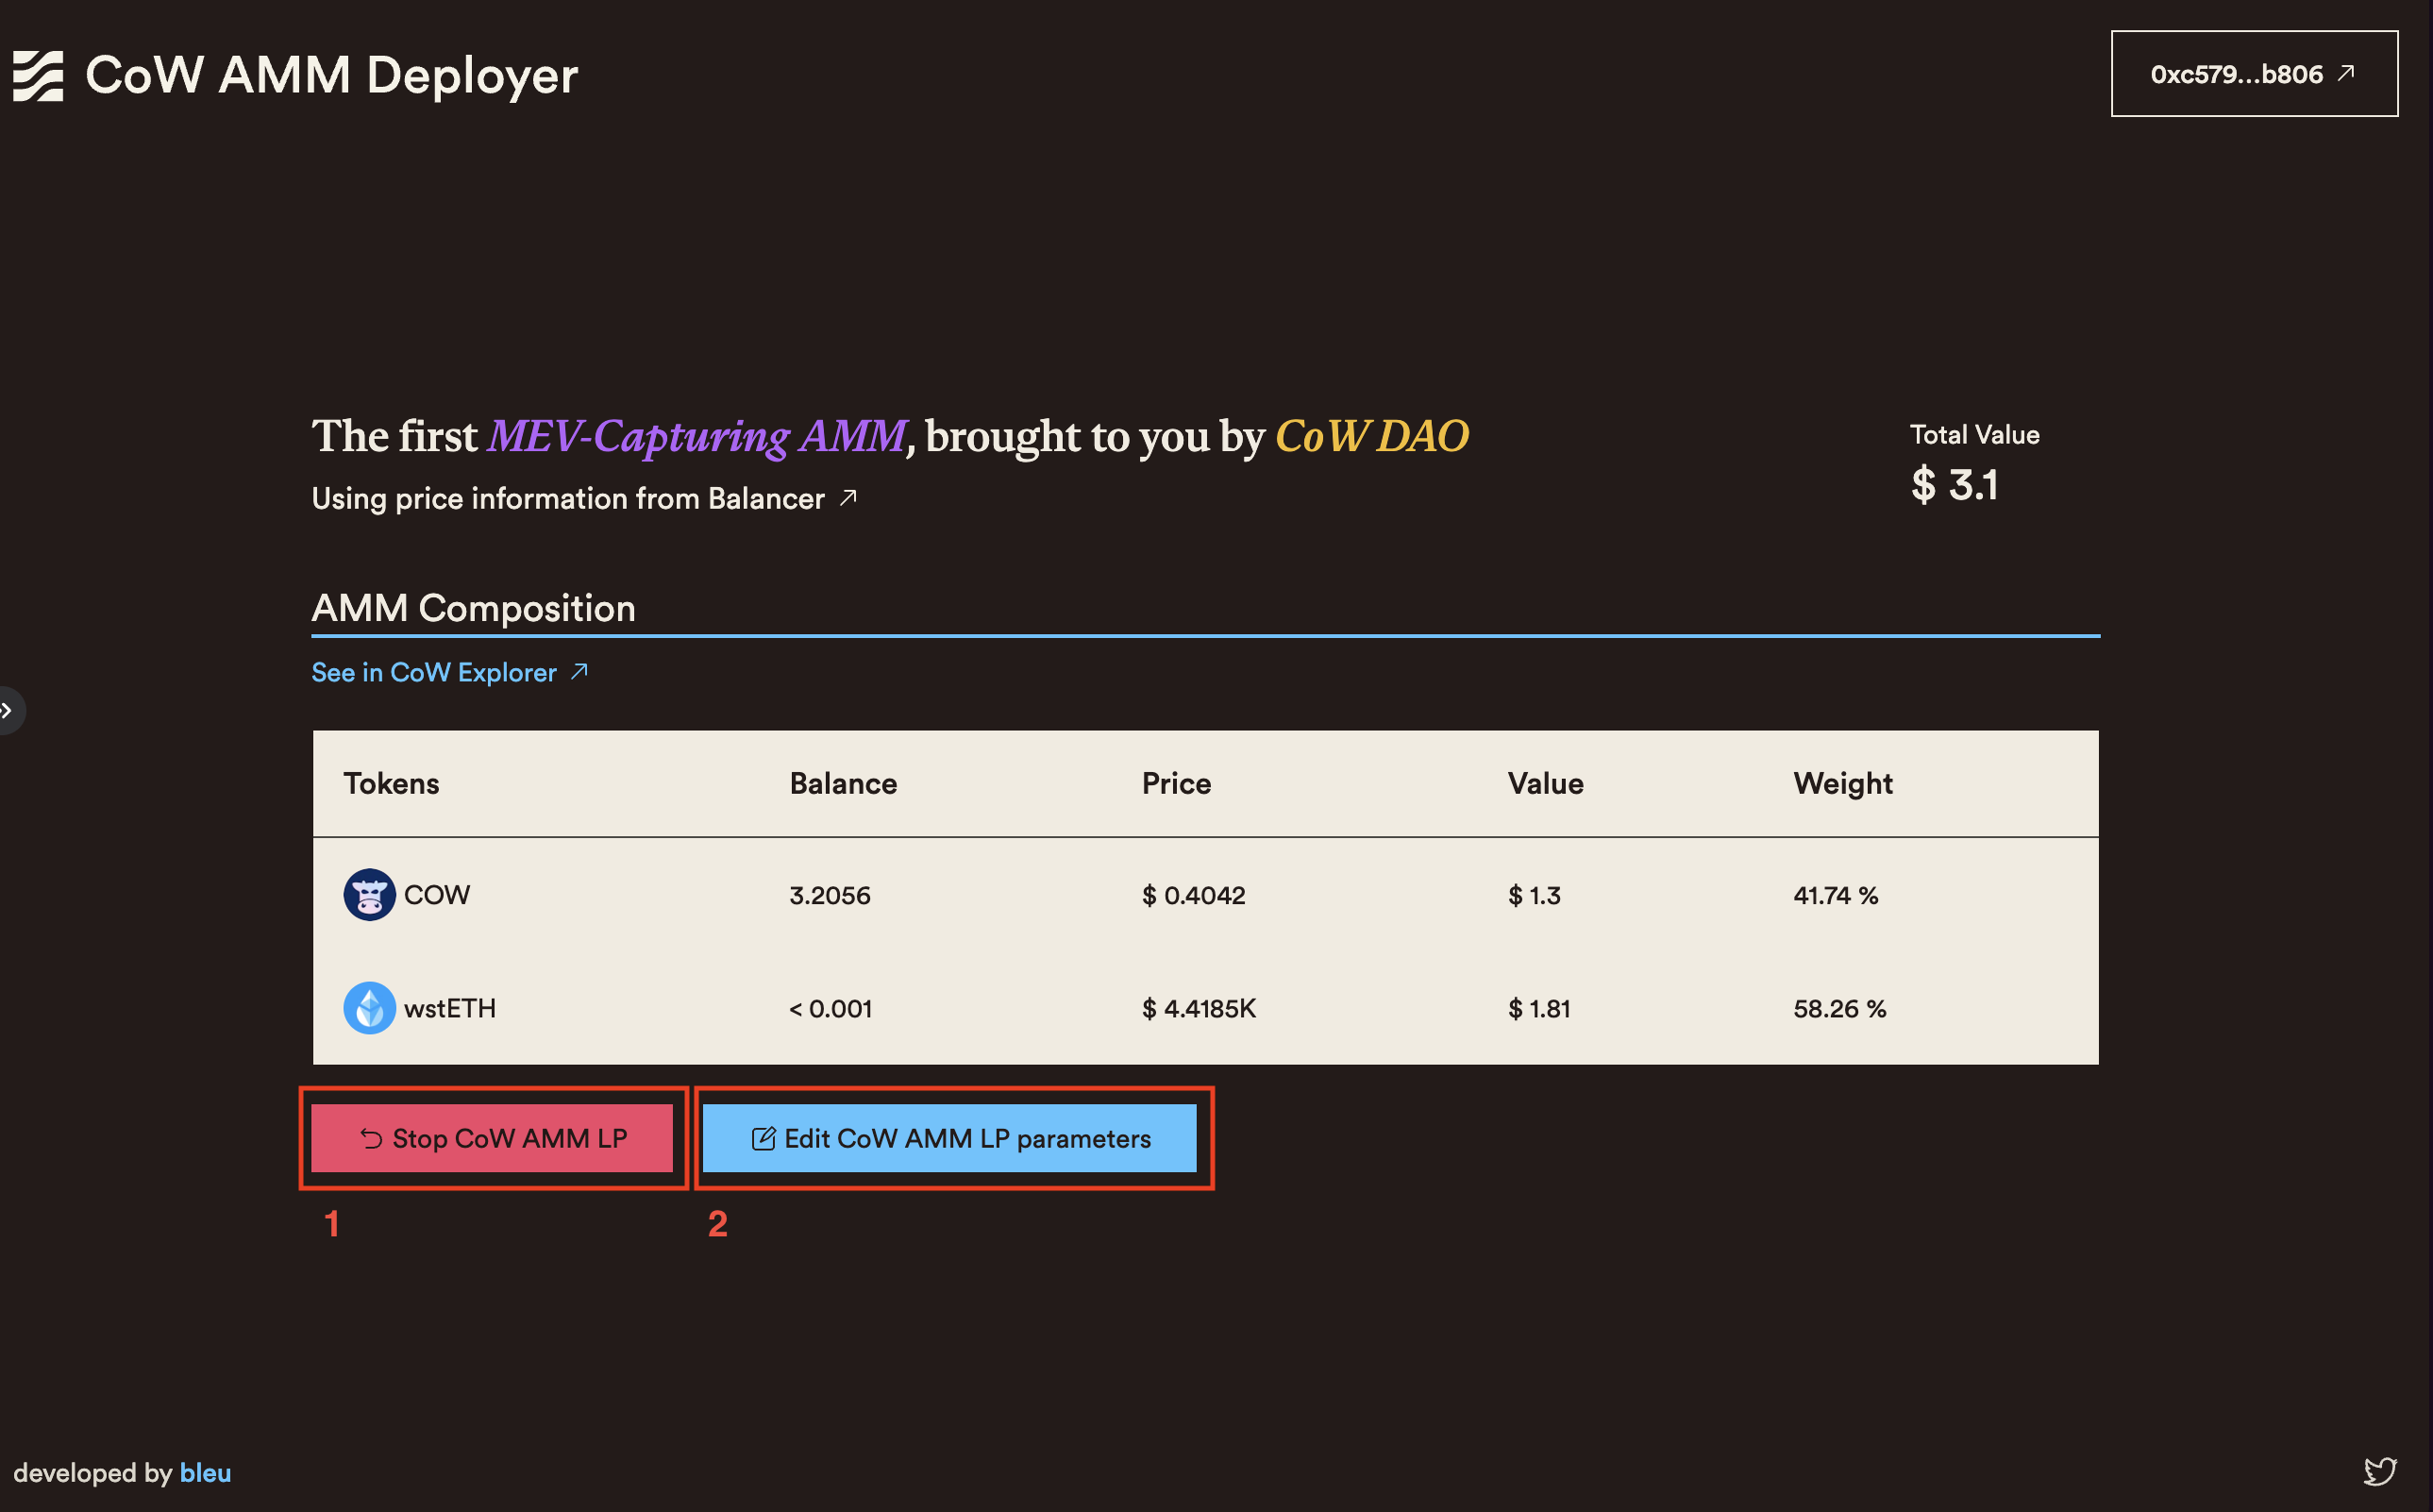
The “Manager” page provides an overview of your CoW AMM LP position and allows you to manage and edit its parameters. The page displays the following information:- Total Value: The total value of the liquidity provided to the AMM, calculated based on the current token prices.
- Token Amounts: The individual amounts of each token in the AMM liquidity pool.
- Price Oracle: The selected price oracle used by the AMM.
- Swaps Link: A link to view the swaps executed by the CoW AMM on the CoW Explorer.
- Stop AMM LP Position: Clicking this button will redirect you to a confirmation page. After confirming, the CoW AMM will be stopped, and the tokens in your Safe wallet will no longer be used to provide liquidity.
- Edit AMM LP Parameters: This action will redirect you to the AMM creation form, pre-filled with the current parameters of the AMM. You can modify the parameters as needed and push the changes your existing AMM.
Additional Resources
Troubleshooting and FAQs
Frequently Asked Questions
-
Can I create multiple CoW AMMs with the same Safe wallet?
- No.
-
What happens to my tokens when I stop an AMM LP position?
- When you stop an AMM LP position, your tokens in your Safe will no longer be used to provide liqudity. As the CoW AMM IS the Safe when there is an active CoW AMM, the liquidity never leaves your Safe wallet! You can then withdraw or use them for other purposes.
-
Can I change the token pair of an existing AMM?
- No, once an AMM is created with a specific token pair, you cannot change the token pair. If you want to provide liquidity for a different token pair, you need to create a new AMM.
#tech-talk channel.
Programmatic Deployment (Without UI)
You may also deploy a CoW AMM through the Balancer UI using this guide. The proposed transactions and interactions can be executed through any smart contract or EOA transaction builder, Etherscan “Write Contract,” from other UI mechanisms, or directly from the console.Factory Contract Addresses
- Ethereum Mainnet:
0xf76c421bAb7df8548604E60deCCcE50477C10462 - Gnosis Chain:
0x703Bd8115E6F21a37BB5Df97f78614ca72Ad7624 - Arbitrum One:
0xE0e2Ba143EE5268DA87D529949a2521115987302 - Base:
0x03362f847B4fAbC12e1Ce98b6b59F94401E4588e - Sepolia Testnet:
0x1E3D76AC2BB67a2D7e8395d3A624b30AA9056DF9
Steps
- Call the
newBPoolfunction of the factory contract. An example transaction can be found here. TheLOG_NEW_POOLlog reveals the address of the newly created pool.
In case ABI of the factory contract is not fetched, the ABI from the Sepolia network can be used.
- Approve the tokens by calling
approve()on the relevant ERC-20 token contract, with the “spender” set to the newly created BPool address.
-
Bind the approved tokens to the pool using the
bind()function of the pool contract. One bind per token. Thedenormparameter should always be set to1000000000000000000(10^18). -
Set the swap fee by calling
setSwapFee()on the pool contract. The fee is specified in wei (10^17 = 10%).
To guarantee full LVR protection, set the fee to 100% (technically up to 99.99%).
- Finalize the pool by calling
finalize()on the pool contract.